Good morning,
That is one awesome, awesome Pz IV! It's a fine line between too much scale detail and having the ability to actually run the tank but I think you aced it. ;o) Like you said, a little bracing and it can go anywhere and look completely real doing it. Kudos, sir. Following along and watching for all of the water cans to show up on the turret. ;o)
regards,
Painless
Panzer IV Ausf F1 to H Build
Forum rules
This section is for posting a build log of your Heng Long tank.
Questions relating to issues you are having with your tank(s) should be posted in the General Questions forum here: viewforum.php?f=14
This section is for posting a build log of your Heng Long tank.
Questions relating to issues you are having with your tank(s) should be posted in the General Questions forum here: viewforum.php?f=14
-
PainlessWolf

- Lieutenant-Colonel
- Posts: 7407
- Joined: Sun Feb 26, 2012 9:09 pm
- Location: Southern Colorado Rocky Mountains
Re: Panzer IV Ausf F1 to H Build
...Here for the Dawn...
Re: Panzer IV Ausf F1 to H Build
I like it. Looks awesome!
So, what did you do about the gearboxes? Just leave the sprockets (and the gearboxes) at the stock height? Or, were you able to raise them a little?
So, what did you do about the gearboxes? Just leave the sprockets (and the gearboxes) at the stock height? Or, were you able to raise them a little?

Re: Panzer IV Ausf F1 to H Build
Thanks for the kind words guys, as you say PainlessWolf, its difficult to balance between detail and usability. I have run the tank round the house and its OK but outside the Schurzen have to come off or they fall off 
Philipat I managed to raise the height by about 1.6mm (thats the thickness of the plate the boxes are on), a lot of the trouble is the huge amount of wiring (for servo recoil, flash, etc.) this coupled with the IBU2 being on its side along the battery box makes space a bit tight. I think I will have to add a thin filler strip across the front plate or use a Clark TK22 I have left over.
If I had cut the battery box out I would have had more room. I suppose the ultimate answer would be an asiatam lower but I wanted to keep the build cost low on this one.
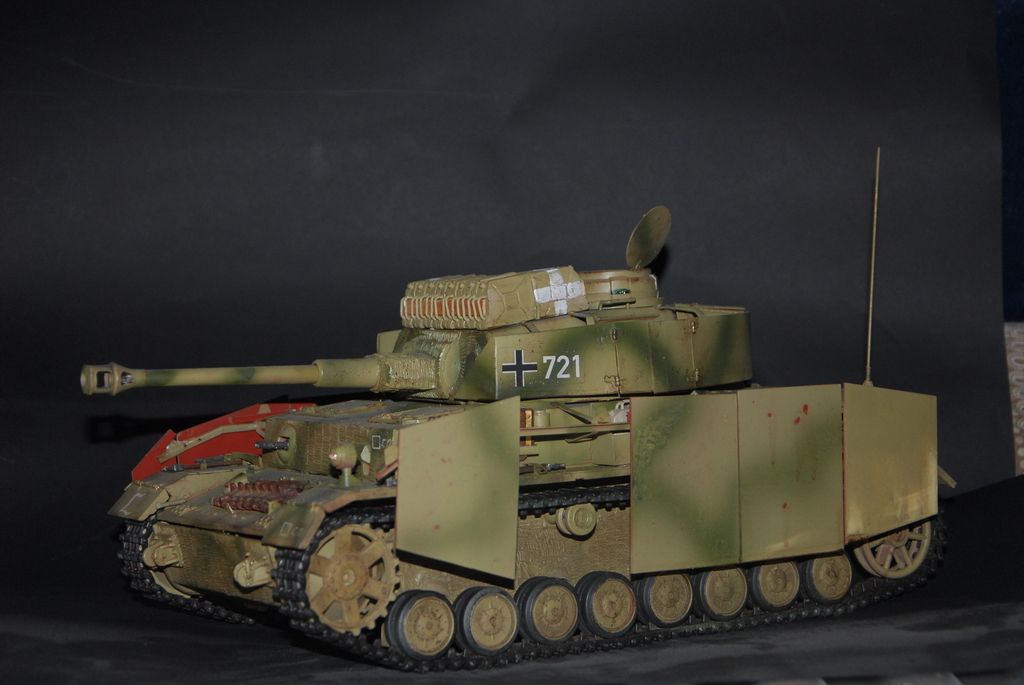
I have finished the schurzen off and added the tools etc and those cans. I painted some up to represent water cans (In my readings I found a picture of a P4 with similar cans on, apparently the crews carried a good supply of water with them, they were not petrol cans).
I did the skirts up to look like some had been replaced over time, and left one off. I note most photos from the time show damaged and missing skirts so I would assume when the tanks were repaired new skirts would be added alongside the old ones?
I'm about ready to call this one finished :
:
Philipat I managed to raise the height by about 1.6mm (thats the thickness of the plate the boxes are on), a lot of the trouble is the huge amount of wiring (for servo recoil, flash, etc.) this coupled with the IBU2 being on its side along the battery box makes space a bit tight. I think I will have to add a thin filler strip across the front plate or use a Clark TK22 I have left over.
If I had cut the battery box out I would have had more room. I suppose the ultimate answer would be an asiatam lower but I wanted to keep the build cost low on this one.
I have finished the schurzen off and added the tools etc and those cans. I painted some up to represent water cans (In my readings I found a picture of a P4 with similar cans on, apparently the crews carried a good supply of water with them, they were not petrol cans).
I did the skirts up to look like some had been replaced over time, and left one off. I note most photos from the time show damaged and missing skirts so I would assume when the tanks were repaired new skirts would be added alongside the old ones?
I'm about ready to call this one finished

You can never have too many tanks...... 
Re: Panzer IV Ausf F1 to H Build
Awesome! I think you could definitely put a fork in this one and call it done! It looks great.
I went back through your other photos and it looks like raising it by 1.6-mm definitely gave it the flat across the top look that it needs. I think that will be my objective, about 1.5-2.0 mm.
I did hack out the battery box. So, I'm hoping to gain some space that way.
I went back through your other photos and it looks like raising it by 1.6-mm definitely gave it the flat across the top look that it needs. I think that will be my objective, about 1.5-2.0 mm.
I did hack out the battery box. So, I'm hoping to gain some space that way.
-
HERMAN BIX

- Brigadier
- Posts: 10318
- Joined: Sun Jan 12, 2014 12:15 am
- Location: Gold Coast,Australia
Re: Panzer IV Ausf F1 to H Build
Ahhhhh, the jerry cans are fitted  Magnificent work Mr Rob, captured the essence of a PzIV , good onya
HL JAGDPANTHER,HL TIGER 1,HL PzIII MUNITIONSCHLEPPER, HL KT OCTOPUS,HL PANTHER ZU-FUSS,HL STuG III,HL T34/85 BEDSPRING,
HL PZIV MALTA,MATORRO JAGDTIGER,HL F05 TIGER,TAMIYA KT,HL PANTHERDOZER,HL EARLY PANTHER G,TAIGEN/RAMINATOR T34/76,
HL AN-BRI-RAM SU-85
HL PZIV MALTA,MATORRO JAGDTIGER,HL F05 TIGER,TAMIYA KT,HL PANTHERDOZER,HL EARLY PANTHER G,TAIGEN/RAMINATOR T34/76,
HL AN-BRI-RAM SU-85
Re: Panzer IV Ausf F1 to H Build
Thanks guys, I will try to get some better photos when the weathers good and post up.
No Internet at home for a week so can only post stuff when at work......
No Internet at home for a week so can only post stuff when at work......
You can never have too many tanks......
-
panzer man
- Lance Corporal
- Posts: 107
- Joined: Sun Sep 13, 2015 9:10 pm
- Location: San Diego, California USA
Re: Panzer IV Ausf F1 to H Build
KTRob wrote:Been busy, almost got lower hull finished:
Primer coat (Halfords red primer)
Mr Surface texturing came through on exhaust:
Dunkelgelb base coat (Tamiya TS3)
Bucket of wheels:
I have been playing with the suspension, I think I need to add another spring leaf so will probably chop up a scrap hedgecutter recoil starter! for the spring steel.


-
panzer man
- Lance Corporal
- Posts: 107
- Joined: Sun Sep 13, 2015 9:10 pm
- Location: San Diego, California USA
Re: Panzer IV Ausf F1 to H Build
Nice work! Was your dark gelb sprayed straight out of a spray can? I was thinking about using Tamiya's dark yellow spray paint to paint my Tiger I but wasn't sure if it would be too dark for this scale.
Re: Panzer IV Ausf F1 to H Build
Thanks Panzer Man, yes it was sprayed on direct from a Tamiya Can.
I just started using an airbrush to spray complete hulls, which seems to be a more economical way of doing it (the cans are quite pricey).
I just started using an airbrush to spray complete hulls, which seems to be a more economical way of doing it (the cans are quite pricey).
You can never have too many tanks......
