Converting HL Panther "G" to a Late "A"
Forum rules
This section is for posting a build log of your Heng Long tank.
Questions relating to issues you are having with your tank(s) should be posted in the General Questions forum here: viewforum.php?f=14
This section is for posting a build log of your Heng Long tank.
Questions relating to issues you are having with your tank(s) should be posted in the General Questions forum here: viewforum.php?f=14
Re: Converting HL Panther "G" to a Late "A"
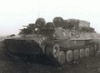
Agree with you dgsselkirk. The photo looks like the rear deck of a panther g. The elevated cooling tower is the giveaway.
Re: Converting HL Panther "G" to a Late "A"
To this theme also some pictures from me.
a very early "D"
And once again to the front hatches...
Greeting Hotte
IG-Panzerjäger Berlin
HL Tiger I late (ElMod)
Torro Kingtiger (ElMod)
Tamiya Tiger I early (ElMod)
Tamiya Panther G (ElMod)
The thinking is allowed to all people, but many are spared. (Curt Goetz 1888-1960)
IG-Panzerjäger Berlin
HL Tiger I late (ElMod)
Torro Kingtiger (ElMod)
Tamiya Tiger I early (ElMod)
Tamiya Panther G (ElMod)
The thinking is allowed to all people, but many are spared. (Curt Goetz 1888-1960)
Re: Converting HL Panther "G" to a Late "A"
Isn't the spatter screen shaped like wedges?dgsselkirk wrote:It does look like factory photo no question. Just wish we could dig up a few more shots to verify. I have never seen it on the D's and A's only the G though...
Yes, my $1.00 splatter screen matches this pretty good and even to scale!
ALPHA
-
dgsselkirk

- Warrant Officer 2nd Class
- Posts: 1484
- Joined: Tue Oct 16, 2012 1:57 am
- Location: Kitchener, Ontario, Canada
- Contact:
Re: Converting HL Panther "G" to a Late "A"
Wedges? 
I don't think so unless I am missing something.
- screen.jpg (77.53 KiB) Viewed 4273 times
"There are things in Russia which are not as they seem..."
Georgy Konstantinovich Zhukov
Georgy Konstantinovich Zhukov
Re: Converting HL Panther "G" to a Late "A"
How come your spatter screen is square????????????????  the ones I picked up are wedge shaped much smaller than the ones I already use... but same shaped mesh
I'll try to get a photo
ALPHA
I'll try to get a photo
ALPHA
-
dgsselkirk
- Warrant Officer 2nd Class
- Posts: 1484
- Joined: Tue Oct 16, 2012 1:57 am
- Location: Kitchener, Ontario, Canada
- Contact:
Re: Converting HL Panther "G" to a Late "A"
And so we continue.... 
I thought it was time to do the hatches. I was not looking forward to it because I wanted to make them sort of operational but easy enough if one got snapped off during battle it would be easy to fix.
I also wanted to make it sort of look like the real thing so I needed a tube that would have an inner tube to slide up and down and what I came up with was the end of a syringe cut off and mounted to look like the main support tube on the real thing.
Then I used a thinned down piece of copper tube that fits nice and snug in the syringe end.
well I waited for the superglue to dry thought I would add the lift handles. Now, this is a trick I use to mount my handles. I don't think I have shown it before. Sometimes getting the holes right for the handles can be tough. you make them too narrow so you have to bend the handle ends in to fit in the holes or too wide and you have to open up the handle too much and it doesn't look right so here is what I do. Make your perfect shaped handle out of a paper clip and have the ends longer than they should be so they will go into the plastic. Drill one small hole for one end of the handle to go in as a guide. Don't drill it deep just a small hole to seat the end in. Now, gently touch a hot soldering iron to it and put some slight pressure on it and it will start to go down into the plastic. Watch your depth so they don't go too far in. Once you have it right and have stopped applying heat you will find that it is pretty sturdy and shouldn't need glue. Also you can see a little of the melted plastic pushes up around the handle so you can score this with an xacto knife and it will look like weld bead!
Now I wanted to make the stops so some 2mm styrene and some sturdy brass sheet and got to work on them. I used a saw to make a split down the plastic on the ends of a long piece then cut it in half to make the 2 stops. The brass I drew the rough shape on and formed it with a dremel on slow with the piece held in hobby forceps.
you have to play with them a bit so the brass fits right but once you have them how you like them then you drill a small hole where the pintle would go through. Take your time and drill slow to go through the plastic and brass.
I thought it was time to do the hatches. I was not looking forward to it because I wanted to make them sort of operational but easy enough if one got snapped off during battle it would be easy to fix.
- Panther A 101.jpg (46.51 KiB) Viewed 4253 times
- Panther A 102.jpg (54.49 KiB) Viewed 4253 times
- Panther A 103.jpg (53.71 KiB) Viewed 4253 times
- Panther A 104.jpg (38.59 KiB) Viewed 4253 times
- Panther A 105.jpg (40.67 KiB) Viewed 4253 times
- Panther A 106.jpg (32.37 KiB) Viewed 4253 times
- Panther A 107.jpg (66.76 KiB) Viewed 4253 times
- Panther A 108.jpg (73.3 KiB) Viewed 4253 times
- Panther A 109.jpg (64.71 KiB) Viewed 4253 times
- Panther A 110.jpg (66.18 KiB) Viewed 4253 times
"There are things in Russia which are not as they seem..."
Georgy Konstantinovich Zhukov
Georgy Konstantinovich Zhukov
-
dgsselkirk
- Warrant Officer 2nd Class
- Posts: 1484
- Joined: Tue Oct 16, 2012 1:57 am
- Location: Kitchener, Ontario, Canada
- Contact:
Re: Converting HL Panther "G" to a Late "A"
Once you have the hole drilled through you need a pin so I use plastic trees from old model kits. Heat it, stretch it and you have your pins! Just cut it and push the styrene through the hole till you get it to a thick enough part that the pin is snug but not so snug that the brass catch doesn't move. Then cut it off close the side and again, using the soldering iron bring it in close to the end of the pin and just touch it gently and it will form a nice little bolt head. Do it on the other side and viola! you have a functioning catch!
The bottom release handles are simply some copper wire and some really thin copper wire. Drill your hole, bend the thicker copper wire at the bottom 90 degrees making sure you don't make it too long that it comes out the other side but long enough to mount the spring wire. Make sure you use just a slightly smaller drill bit for the hole and you can use the soldering gun idea again to mount it. wind the thin wire around the 90 degree neck and you have a nice looking hatch catch...
I secured the posts underneath and the thin copper post with 2 part epoxy and before it set real hard did a test fit. I also did a rough fit of the hatch catches to see if I had the right height.
I like them! don't know how long they will last but pretty easy to make.
- Panther A 111.jpg (64.42 KiB) Viewed 4252 times
- Panther A 112.jpg (64.64 KiB) Viewed 4252 times
- Panther A 113.jpg (57.47 KiB) Viewed 4252 times
- Panther A 114.jpg (37.06 KiB) Viewed 4252 times
- Panther A 115.jpg (31.25 KiB) Viewed 4252 times
- Panther A 116.jpg (40.49 KiB) Viewed 4252 times
"There are things in Russia which are not as they seem..."
Georgy Konstantinovich Zhukov
Georgy Konstantinovich Zhukov
-
HERMAN BIX

- Brigadier
- Posts: 10322
- Joined: Sun Jan 12, 2014 12:15 am
- Location: Gold Coast,Australia
Re: Converting HL Panther "G" to a Late "A"
oh yeah, easy............  Not for this kid mate .
These kind of details really do set out the standards for getting things right.
Bar is set high.....................Im just going to sit at the bar & watch
These kind of details really do set out the standards for getting things right.
Bar is set high.....................Im just going to sit at the bar & watch
HL JAGDPANTHER,HL TIGER 1,HL PzIII MUNITIONSCHLEPPER, HL KT OCTOPUS,HL PANTHER ZU-FUSS,HL STuG III,HL T34/85 BEDSPRING,
HL PZIV MALTA,MATORRO JAGDTIGER,HL F05 TIGER,TAMIYA KT,HL PANTHERDOZER,HL EARLY PANTHER G,TAIGEN/RAMINATOR T34/76,
HL AN-BRI-RAM SU-85
HL PZIV MALTA,MATORRO JAGDTIGER,HL F05 TIGER,TAMIYA KT,HL PANTHERDOZER,HL EARLY PANTHER G,TAIGEN/RAMINATOR T34/76,
HL AN-BRI-RAM SU-85
-
dgsselkirk
- Warrant Officer 2nd Class
- Posts: 1484
- Joined: Tue Oct 16, 2012 1:57 am
- Location: Kitchener, Ontario, Canada
- Contact:
Re: Converting HL Panther "G" to a Late "A"
Trust me, sometimes I go to the bar first before I do some of these tricks! LOL!
"There are things in Russia which are not as they seem..."
Georgy Konstantinovich Zhukov
Georgy Konstantinovich Zhukov
Re: Converting HL Panther "G" to a Late "A"
Well... I'm going to have to put that little gem on a new list..... the list of things never to do unless I really have too
As Herman said...think that's more fun to watch than do Great Job dgsselkirk
ALPHA
As Herman said...think that's more fun to watch than do
ALPHA
