King Tiger Restoration.

This section is for you to give a commentary / build log of your Tamiya tank. Remember - lots of pictures please!
Forum rules
This section is for posting a build log of your Tamiya tank.
Questions relating to issues you are having with your tank(s) should be posted in the General Questions forum here: viewforum.php?f=14
MPFIEND
Private
Posts: 64
Joined: Sat Feb 01, 2014 7:36 pm
Location: West Sussex

King Tiger Restoration.

Post by MPFIEND »

Good Evening,

I am just in the process of rebuilding my Tamiya King Tiger Tank which I have had for about 8 years.
When it was assembled the first time around it was never powered up or tested (as I had no radio equipment) and it had a one colour paint job which was quite frankly shocking.

I have dis assembled the model and removed all of the paint, I have also purchased various new parts from around the internet.

Here are the original parts with the paint removed, you will notice that the wheels are not present as they are still having the paint stripped from them.

Image

Here are all the clever electronic bits and motors etc.

Image

And here are the new parts I have sourced from the internet.

Image

The build will start fairly soon once the wheels are cleaned.

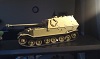
I plan to give this a three colour scheme some thing along the lines of this 1/35 scale Dragon offering (minus the Zimmerit coating) which I built late last year as an experiment for the King Tiger Restoration.

Image

I am still undecided which way to go with the Radio Gear, either a Spectrum digital system (as I have 2 unbuilt tanks also Leopard 2A6 and the JS-2) or a Planet system.
I'll look forward to hearing your thoughts on that one.

Best Regards

Keith
User avatar
[ICE]monkey
2nd Lieutenant
Posts: 2669
Joined: Wed Sep 10, 2008 5:58 pm
Location: pluckley ,ashford ,kent

Re: King Tiger Restoration.

Post by [ICE]monkey »

Good start, i like the 1/35th scales paint scheme , as for the tx , its more of a personal choice , both seem popular
regards, Cliff
User avatar
PainlessWolf
Lieutenant-Colonel
Posts: 7405
Joined: Sun Feb 26, 2012 9:09 pm
Location: Southern Colorado Rocky Mountains

Re: King Tiger Restoration.

Post by PainlessWolf »

Good Afternoon,
You've made a great start. The old parts for the tank, san the hull and turret , look like they are new out of the box. This will be an interesting rebuild.
regards,
Painless
...Here for the Dawn...
User avatar
jarndice
Colonel
Posts: 8018
Joined: Mon Sep 03, 2012 11:27 am
Location: the mountains of hertfordshire

Re: King Tiger Restoration.

Post by jarndice »

Hallo Keith, straining at the starting gate are we, well I wonder if you have scrolled down to the Reference Camo Pattern site? once you arrive you will see a list of Tanks, select King Tiger, then you will get another list you want KING TIGER RUSSIAN SOURCE, It is a bit of a wonderland of different camo patterns for Tiger 2s, click on a particular tank and it will enlarge the picture, I nearly said blow up the picture but that seems wrong! good luck. :thumbup: shaun
I think I am about to upset someone :haha:
MPFIEND
Private
Posts: 64
Joined: Sat Feb 01, 2014 7:36 pm
Location: West Sussex

Re: King Tiger Restoration.

Post by MPFIEND »

Thanks for the interest Gents,

Cliff thanks very much.

PW, Thanks very much,, it's taken quite a while to get all the old paint off, for the metal parts I used a toluene based airbrush cleaner which is very aggressive, it's no good for plastic though as it melts it almost immediately. Brake fluid was used for the Hull and turret, as you can see though some areas are still stained from the primer which I cannot remove. The wheels are basking in oven cleaner at the moment but still the paint is not shifting, so they too need to take a bath in the Brake fluid.

Shaun, Thank you, I took a look at the Reference section you posted and there are some very interesting schemes there, I particularly like the Ambush versions.

I have started putting the metal parts of the chassis back together now, I have fitted the Torsion bar stays, suspension housings and the tensioner side plates along with the two metal fenders.
I will post another photo once I have the suspension arms and torsion bars fitted.

Best Regards,

Keith
MPFIEND
Private
Posts: 64
Joined: Sat Feb 01, 2014 7:36 pm
Location: West Sussex

Re: King Tiger Restoration.

Post by MPFIEND »

Good Evening,

Torsion bars and suspension arms fitted.

Image
Image

Upper Hull test fitted.

Image

More soon,

Best Regards

Keith.
MPFIEND
Private
Posts: 64
Joined: Sat Feb 01, 2014 7:36 pm
Location: West Sussex

Re: King Tiger Restoration.

Post by MPFIEND »

Good afternoon,

A little more progress to report
I have now fitted the lower hull front parts and the Rear panel assembly.
There were quite a few ejector pin marks on these parts which I have filled with Squadron green filler and sanded back.
The rear panel towing eyes are only dry fitted at the moment as I will fix every thing after the first test run.

Image

in this second photo, I hadn't noticed these gaps before between the rear panel and the hull, I'll have to fabricate some thing from evergreen to fill them I guess.

Image

I have also added the MFU, both left and right Gearboxes and the speaker Assembly, these will be removed again after the first test run so that I can paint the hull with more ease.
I have ordered a battery and charger this morning, just a cheap option for testing at the moment as I am looking into the possibility of using LiPo's once I am more familiar with the technology.

Image

One last shot with the top hull in place to check for fit, I have started to fill in the damage caused by removing the old parts and sanding back. before painting I will add a textured finish to give the effect of rolled steel.

Image

I am still undecided which way to go with the Tx and Rx set up. I have narrowed it down now to either the Planet T5 or the Spektrum DX6i.
After trawling the net reading various articles on the set up of the Spektrum sets I am more happy with whats involved and have seen various users with full function on both Tamiya Tanks and Trucks. (I quite fancy a Scania R620 now also. it would look good hauling my Leopard on a low loader!)

As always I look forward to reading your comments and thoughts on these subjects.

Best Regards

Keith.
User avatar
lister fiend
Sergeant
Posts: 565
Joined: Mon Sep 10, 2012 3:38 pm
Location: ashvale, hampshire

Re: King Tiger Restoration.

Post by lister fiend »

hey keith.
that's starting to come together quite nicely :thumbup:
i take it the brake fluid wasn't that effective then?
so which camo pattern are you going to do then?
cheers
lister
MPFIEND
Private
Posts: 64
Joined: Sat Feb 01, 2014 7:36 pm
Location: West Sussex

Re: King Tiger Restoration.

Post by MPFIEND »

Hey Lister,

Thanks very much, the brake fluid did shift the bulk of the paint on the upper hull, I had to leave it submerged for 24 hrs though. There is still a trace of primer in some areas, but this will all disappear once I re-prime the hull. The wheels though are a different matter. They have been in the fluid now all weekend and the paint hasn't shifted at all, I may have to go with plan C on those.

I've ordered an Orange R615 receiver this evening for £8. So I guess now I will have to bite the bullet and go with the Spektrum TX.

I think for the paint scheme I will follow the 1/35 model I posted earlier in the thread, although I may do some sort of hard edge ambush scheme. Still a little un-decided.

Best Regards

Keith.
MPFIEND
Private
Posts: 64
Joined: Sat Feb 01, 2014 7:36 pm
Location: West Sussex

Re: King Tiger Restoration.

Post by MPFIEND »

So time for an update.

Today I received my spektrum Dx6i from Kings Lynn models. First class service, good prices and a speedy next day delivery.
With a NiCad battery fully charged and my newly received Orange RX R620 receiver I pieced together the electronic components of my king tiger build.
The receiver was connected to the MFU channel 1 to channel 1 only and the bind plug installed.
I flicked the power switch and the receiver sprang into life with a rapid flash if the LED as expected waiting for the bind signal from the TX. So far so good. I powered down the MFU.
Next I put batteries into the Tx and switched on then I set up the TX with all travel set to 100%.
Next the receiver was bound to the TX, so far so good.
I then switched off again and wired the receiver to the MFU 1-1, 2-2 etc.
I turned on the MFU first then the TX and the engine sound roared to life.
I then carried out the DMD set up routine, still all ok. Next I switched off the TX and the MFC.
I then changed the travel for the Elevator channel to 125% in both directions, switched off and back on again.
Engine fired up turret rotated, gun elevated, fired, recoiled and the machine gun operated all as expected. BUT, I had no drive forward or reverse and no steering!
After trying various different set up scenarios I finally realised that the channels needed to be swapped on the receiver to give the correct operation. I ended up with the following.
DMD Channel 1 to RX Channel 4 (Rudder)
DMD Channel 2 to RX Channel 1 (Throttle)
DMD Channel 3 to RX Channel 3 (Elevator)
DMD Channel 4 to RX Channel 2 (Aileron)

Once these changes were made I also had to reverse the throttle and rudder to get the steering and throttle to operate in the correct manner.
The DMD was then reprogrammed and every thing worked perfectly.
This was a big hurdle for me as I was not sure if I would be able to get every thing working correctly so quickly as I am new to the 2.4 ghz technology.
Now I can break everything down and get on with the build, paint and weathering

Thanks to every one that gave me input into this stage of build, it is very much appreciated and I don't think I could have done it so quickly with out this forum.

More soon.

Best Regards

Keith.
Post Reply

Return to “Tamiya Builds”