Chieftain (Haya) Mk.5 to Mk.10 Modification Build

User avatar
Dr Phibes
Corporal
Posts: 300
Joined: Wed Sep 23, 2015 9:38 pm
Location: Southampton, England, UK

Chieftain (Haya) Mk.5 to Mk.10 Modification Build

Post by Dr Phibes »

Finally, I have been able to bring my latest project forward and present it here. As many of you will know I began this re-build/upgrade some time ago but was hindered greatly by poor health and much time in hospital - whatever. The consequence, however, is that I was unable to bring to the forum a more traditional build thread, much though I would have liked to.
Nonetheless, I have a collection of images of some of the progress I slowly made and I will show these here in a very loosely chronological order (well, sort of). This is very much a cobbled together thread rather than like my previous step by step build threads but I hope some will find it of a little interest anyway. I will try to explain the development and some of the detailing as it unfolded.
I began, of course, with Andrew Haya's Chieftain Mk.3 which makes for an excellent base model for this amazing cold war British tank.
Chief Build 01.jpg
As an RC model it works well enough but I really wanted to do something more for it, both as a RC model and representation of the Chieftain. Haya already sells some 3d printed parts to take this Chieftain from a Mk.3 towards a Mk.5 (the final production version although the army's 'Totem Pole programme' of upgrades provided later versions up to the last, a Mk. 11). Moreover, I already began to modify some parts (e.g. cannon barrel, see in pic above) but was not happy with the results.

Having been up close and personal with Bovington Museum's Mk.11 I eventually decided on upgrading my Chieftain to Mk.10 as this included the visually striking Stillbrew armour upgrade amongst (very many) other things. By opting for a Mk.10 and not the Bovington Mk.11 I also avoided needing to swap out the projector light (searchlight to the rest of us) for the TOGS (Thermal Observation and Gunnery Sight) unit - good move I thought :/ .
Well, I had no idea what a challenge and rabbit hole this was going to be! 8O

Early on I made a start by designing and making the various parts needed to upgrade the Chieftain to Mk.5 and beyond. The following are just a few of the 3D printed parts I made. In fact I designed and printed around 50-60 parts in the end but I didn't get to take pictures of them all unfortunately (pictured here is the raised 4 door engine deck, the MRS light projector, MRS mirror housing, cannon boot, Capola ring, Clansman radio box, and fume extractor counterweight)....
Chief Build 02.jpg
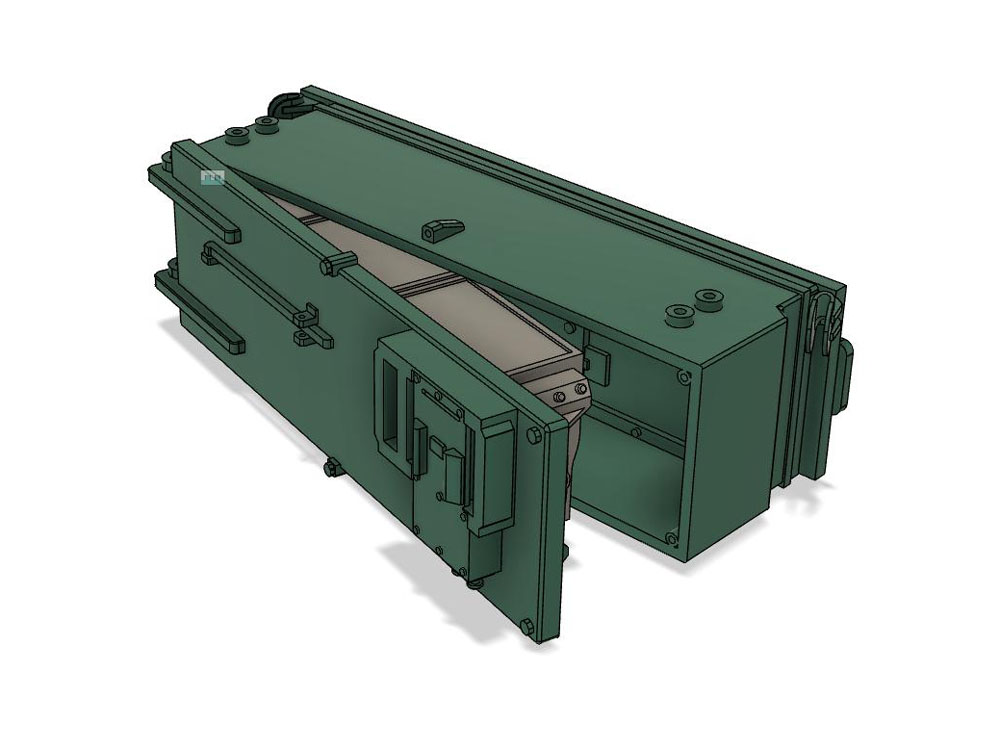
Here are a couple of the more difficult parts from the Fusion 360 collection, the NBC no.6 pack for the rear of the turret and the later design travel lock which I designed to be fully functional.....
NBC Turret Pack (No.6) - Fusion 360.jpg
NBC Turret Pack (No.6) - Fusion 360.jpg (75.5 KiB) Viewed 3291 times
Travel Lock Fusion 360.jpg
Travel Lock Fusion 360.jpg (36.75 KiB) Viewed 3291 times
Some of these parts I installed on the turret and upper hull during the strip down
Having begun to strip down the Chieftain I began installing some of the upgrade parts. However, I eventually arrived at the point where I need to tackle something that I knew was going to be a bit of a challenge - the StillBrew armour 8O . I knew this was going to be a challenge because I had little available in terms of data for the shapes, depthss and angles, etc, involved and I am just not too good at all when it comes to surfacing modelling in Fusion 360 . Well, the truth is this is my Waterloo, so to speak, so I decided :think: to do it the old way - the really old way with modelling clay. The reason for this was that using this medium provides a long drying time, and time is what I needed if I was going to get this anywhere near where I wanted to be......
Chief Build 03.jpg
Over several days, as time permitted, I worked the surfaces, sanding, grinding, etc, and applying liberal quantities of Mr Surfacer too ;) ...
Chief Build 04.jpg
The picture below shows some of the detail added to the front of the upper hull, not least of which is the two Stillbrew armour collars either side of the drivers periscope as well as the new sidelights now complete with working switchable LED lights, cast identification letters and numbers on the glacis plate, and a modified drivers hatch with the lock, latch, and travel stop, etc. Additionally, the drillings for the turret ring bearings are visible here. Ironically (perhaps), the addition of Stillbrew armour to the turret of my Chieftain has made the it much heavier, just as this did to actual tank (by some 2.25 tons apparently). As a precauation I decided to add ball bearings to the face which are supported underneath by a reinforcement ring that i 3D printed earlier. I also upgraded the turret drive ring and gearbox to the all metal versions.....
Chief Build 05.jpg
The next picture shows the upper hull primed prior to top coating. Visible here are the nearly 40 8O handles that festoon the 'bazooka plates' (skirts to me). For practicality I used stiff wire sheived with shrink wrap - I just knew that being a working RC model any paint would otherwise wear off very quickly. The glacis plate casting effects can now be seen, as can the mud flaps and the bazooka plate fixings and tow cable fittings (all missing previously). Notice, in particular, the cutaway to the corner of the triangular storage bin, this is not present on the left side bin.......
Chief Build 06.jpg
In the next post I will show some of the internal changes and upgrades (that I hope will be of some interest :think: :D ), many of which were made concurrently with the development of the outer hull and turret (more on this to follow).
User avatar
BarryC
2nd Lieutenant
Posts: 2468
Joined: Sun Jan 03, 2016 11:43 am
Location: Savannah, GA. USA

Re: Chieftain (Haya) Mk.5 to Mk.10 Modification Build

Post by BarryC »

Good show! :clap: :clap:

Exactly what I want to do to my Chieftain. :thumbup:

Barry
"Details make perfection, and perfection is not a detail."
Leonardo Da Vinci
User avatar
Dr Phibes
Corporal
Posts: 300
Joined: Wed Sep 23, 2015 9:38 pm
Location: Southampton, England, UK

Re: Chieftain (Haya) Mk.5 to Mk.10 Modification Build

Post by Dr Phibes »

BarryC wrote:Good show! :clap: :clap:

Exactly what I want to do to my Chieftain. :thumbup:

Barry
Glad you like it Barry, at least so far :D . Look forward to seeing your Chieftain too!
User avatar
Dr Phibes
Corporal
Posts: 300
Joined: Wed Sep 23, 2015 9:38 pm
Location: Southampton, England, UK

Re: Chieftain (Haya) Mk.5 to Mk.10 Modification Build

Post by Dr Phibes »

Following on from my first post (and because image number is limited per post) the next couple of images are of the modifications to the turret internals. What I did here, amongst other things, was to convert the Chieftain turret so as to make the upper shell quickly removal using magnets instead of screws. This way, as with many Tamiya's for example, access to the turret internals is very simple and stress free. This makes for further upgrading being relatively simple too.

The next major change here is the removal of the HL BB unit installed by Haya and replacing this with my own design recoil and elevation unit. I designed this to carry inside sufficient counterweights (penny coins actually!) so as to balance the breech with the long multi-part metal barrel supplied by Haya. This worked perfectly and the whole is now perfectly balanced on the pivot mounting. This takes all the stress off the elevation servo that replaces the HL elevation unit that comes as standard on the Haya Chieftain.
The elevation gearing on my unit is fully adjustable and I also made a selection of helical drive gears so as to get the correct degrees of elevation (still playing with this set up). The Haya recoil servo and set-up I simply adapted to fit the new breech unit........
.
Chief Build 07.jpg
Chief Build 08.jpg
The next two pictures are of something I have been very pleased with (unusually) - a Chieftain specific loudspeaker box that houses a Visaton FRS7. I spend considerable time designing and testing this. The results of my labour, I will say, paid dividends as the sound from the twin reflex port design is excellent. Not only does this sealed unit help increase, measurably, the output from the Visaton speaker but even though I am still running on the Haya TK6.3 (aka HL 6.1s) board separation and detail now picked up through the reflex ports is significantly improved. I think with a Clark TK80 clark board installed (as I am presently contemplating) the sound will be substantially better still. The design, I might add, I have extrapolated over to a similar unit for an as yet un-started T-34/85 project and it works exceptionally well there, even though in that project I am an old Taigen version 1 MFU temporarily installed!......
Chief Build 010.jpg
Chief Build 011.jpg
In the next picture can be seen the new speaker installed in the Chieftain hull. The bonus here is that it maximizes available space for the box and also adds greater structural integrity to the hull itself as it is secured to the hull on both sides. I have also installed her the Heng Long 'Ultimate' premium gearboxes which, so far are proving very good, if running pretty hot on extended test runs - the 6500mh Graphene Lipo may play a part here of course! :think:........
Chief Build 012.jpg
Moving on, then, and back to the finished result (well, sort of) here are the overall results of my Chieftain Mk.3 to Mk.10 modification conversion story.......
Chief Build 014.jpg
I had originally kept to a British bronze green but given that my aim was to represent a late (1987-1990) Chieftain Mk.10 I opted for Nato green and black as was often applied at this time, or so I understand (the British 'Totem Pole' upgrade programme is quite a convoluted enterprise, to say the least}.......
Chief Build 015.jpg
Chief Build 016.jpg
The 'light Projector' as the technical manual referred to it....
Chief Build 16a.jpg
Storage bins, bazooka plate hangers and handles, and damper valve control......
Chief Build 16c.jpg
More pictures to follow............
User avatar
BarryC
2nd Lieutenant
Posts: 2468
Joined: Sun Jan 03, 2016 11:43 am
Location: Savannah, GA. USA

Re: Chieftain (Haya) Mk.5 to Mk.10 Modification Build

Post by BarryC »

WOW! 8O

Turned out fantastically! :thumbup: :thumbup:

I am very interested in your Recoil and Elevation Units. Perhaps even the Visaton Speaker Box. :clap:

Barry
"Details make perfection, and perfection is not a detail."
Leonardo Da Vinci
User avatar
Dr Phibes
Corporal
Posts: 300
Joined: Wed Sep 23, 2015 9:38 pm
Location: Southampton, England, UK

Re: Chieftain (Haya) Mk.5 to Mk.10 Modification Build

Post by Dr Phibes »

From previous post - continuation.........
Chief Build 017.jpg
The travel lock is 3D printed from many parts and opens and closes like the original.
Chief Build 17a.jpg
The NBC pack I modelled here was based on the few images I could find. This was of the No.6 pack which was the standard Totem Pole upgrade to Mk.5's through to Mk.10 when another upgrade to the No.11 filtration unit was introduced. This externally identical (as was No.3 through to No.5) but internally introduced cylindrical filter units. Needless to say I was at first a little disappointed as this seemed to suggested I had the wrong filtration unit in the NBC pack for a Mk.10 Chieftain. However, I discover that, in fact, not all Mk.10's did in fact receive the No.11 filtration pack.
Chief Build 018.jpg
Chief Build 18b.jpg
Chief Build 19.jpg
Chief Build 19a.jpg
Chief Build 19a.jpg (98.38 KiB) Viewed 3251 times
Chief Build 020.jpg
At last, I have something to put the legless brothers in! :lolno:
Chief Build 021.jpg
To say this build is finished is typically incorrect, but at least I have it somewhere near what I imagined as a reasonable rendition of a Mk.10 Cheiftain. This is, though, the end of the first phase, so to speak. I will be tackling other projects for a while but intend to upgrade the electronics, although the Haya/HL 6.3/6.1s is by no means at all bad, and certainlt a huge step up from the earlier RX18's, etc. I further intend to make the turret fully 360 (which it is not at present0 and to re-design the recoil and elevation unit to include a helical gear driven recoil function. ......... It never ends does really does it? :crazy: :D
User avatar
Dr Phibes
Corporal
Posts: 300
Joined: Wed Sep 23, 2015 9:38 pm
Location: Southampton, England, UK

Re: Chieftain (Haya) Mk.5 to Mk.10 Modification Build

Post by Dr Phibes »

opps, double posted :crazy:
User avatar
lmcq11
2nd Lieutenant
Posts: 2610
Joined: Mon Dec 19, 2016 7:42 pm
Location: Quebec, Canada

Re: Chieftain (Haya) Mk.5 to Mk.10 Modification Build

Post by lmcq11 »

Wow, the Stillbrew...
How do you guys manage to keep your build and work area so clean and pleasant ? I am always so dusty...
User avatar
BarryC
2nd Lieutenant
Posts: 2468
Joined: Sun Jan 03, 2016 11:43 am
Location: Savannah, GA. USA

Re: Chieftain (Haya) Mk.5 to Mk.10 Modification Build

Post by BarryC »

lmcq11 wrote: How do you guys manage to keep your build and work area so clean and pleasant ? I am always so dusty...
Excellent question!

Barry
"Details make perfection, and perfection is not a detail."
Leonardo Da Vinci
User avatar
Raminator
Warrant Officer 2nd Class
Posts: 1267
Joined: Tue Aug 11, 2015 9:57 am
Location: Newcastle, Australia

Re: Chieftain (Haya) Mk.5 to Mk.10 Modification Build

Post by Raminator »

Welcome back doctor, I hope you're either on the mend or managing as best you can. Terrific work on the Chieftain conversion, it's an impressive blend of traditional and modern techniques!

Consider me a fan of PhibesTech™. ;)
Post Reply

Return to “Modern Builds”