Hi, thank you everyone for your encouragements.
Max-U52 wrote:When I grow up I want to be as good at this stuff as you are, Louis
I must have looked at the Ludwigs website for over a year before deciding to buy my first Ludwigs basic kit, the M113, and see what i could do with it. Since then, I feel my skillset improved exponentially after being mostly the same for decades while a was doing regular kits or enhancements to HL models. Just try one. I do not think i can go back to Tamiya kits...
This post is for the Driver and Commander's hatch.
After completing the more simplistic driver's hatch, I realised that using Shapeways 3D printed King Tiger periscope would not do. They are of the wrong shape, too small and totally inaccurate. My desire to minimize the workload has again failed with commercial 3D printed parts, I am getting use to it and I will limit future purchases in this area as I have been quite disappointed about these lately. I therefore had to craft the periscope and I needed a lot.
- Ludwigs BMP1 BMP-1 1/16 IFV RC
- Capture.JPG (82.59 KiB) Viewed 3239 times
First step is to create the core component in 3mm thick plasticard.
 Viewed 3239 times")
- Ludwigs BMP1 BMP-1 1/16 IFV RC
Then the front section is created on the same size in 0.5mm plasticard
 Viewed 3239 times")
- Ludwigs BMP1 BMP-1 1/16 IFV RC
The shape of the front (len) section has to be trimmed with a Dremel file because a knife would distort and break them.
 Viewed 3239 times")
- Ludwigs BMP1 BMP-1 1/16 IFV RC
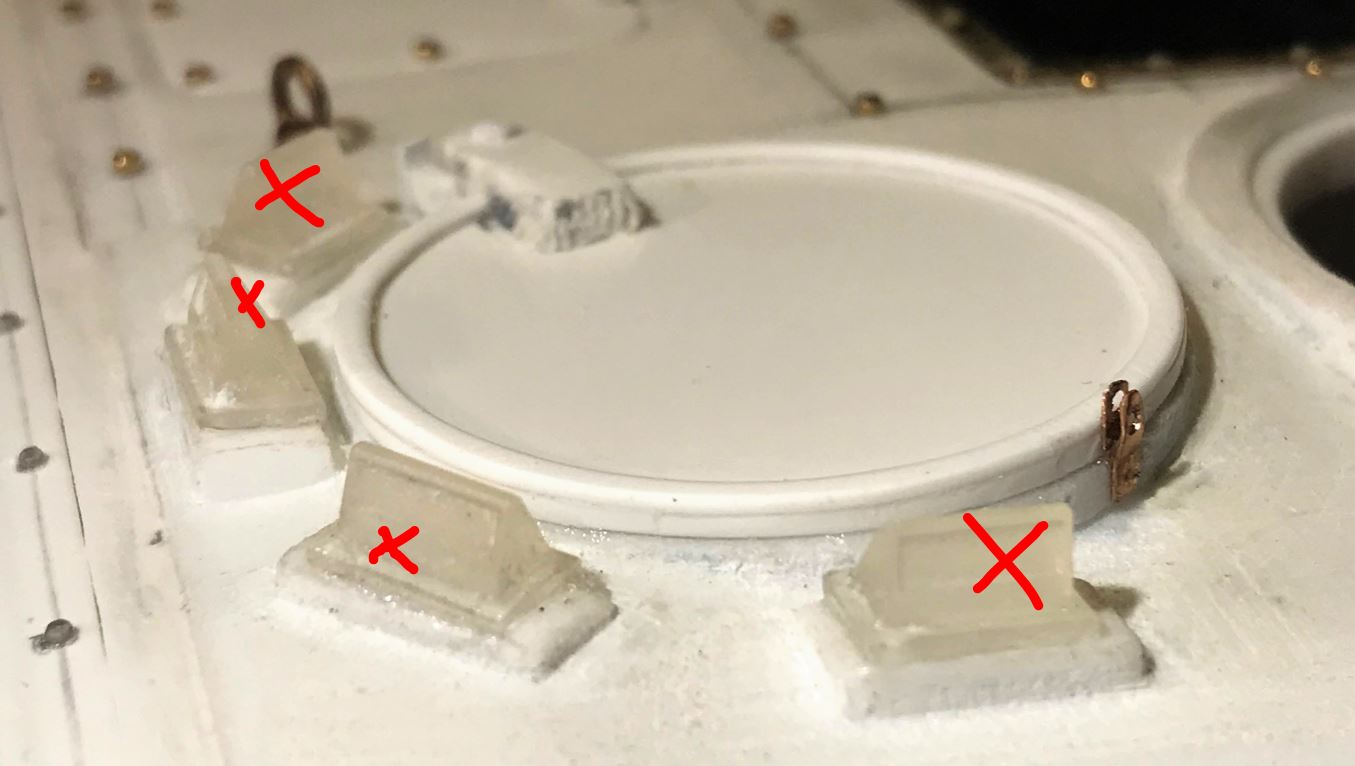
Front and core parts of the periscopes are assembled on the left, and final product showing on the right once shaped and polished with nail files of various grain. I know many modellers would 3D print these but building 6 periscopes took me about 1.5 hours of effort, including the design, prototype and production.
 Viewed 3239 times")
- Ludwigs BMP1 BMP-1 1/16 IFV RC
The more complex commander's cupola is a real puzzle and references must be studied carefully on how to use the parts provided by Christian.
 Viewed 3239 times")
- Ludwigs BMP1 BMP-1 1/16 IFV RC
Christian did a good job in providing the core parts and they can be easily assembled. Accuracy is pretty good, although there are a couple of issues that I did not correct.
 Viewed 3239 times")
- Ludwigs BMP1 BMP-1 1/16 IFV RC
It is the brass job that takes a long time in order to dress up the cupolas and periscopes as per reference pictures, the Trumpeter 1/35 showing very few details in this area. Notice how better the crafted periscopes look compared to the Shapeways parts on the first picture.
 Viewed 3239 times")
- Ludwigs BMP1 BMP-1 1/16 IFV RC
 Viewed 3239 times")
- Ludwigs BMP1 BMP-1 1/16 IFV RC
The 2 brass bolts going up on both side of the central periscope are the attachment for the IR emitter that I will install later.
 Viewed 3239 times")
- Ludwigs BMP1 BMP-1 1/16 IFV RC
More close up on next post.


