M1A1HA, 9/18/23 update. Delay of Game, two week penalty!
Re: M1A1HA, 11-8 Update. Auto Track Tensioner Completed
Hi.
Awesome mechanical engineering Sir, your attention to detail dedication and authenticity to the full scale subject is an inspiration.
Just excellent, there is nothing more to say.
Regards
Sub
Awesome mechanical engineering Sir, your attention to detail dedication and authenticity to the full scale subject is an inspiration.
Just excellent, there is nothing more to say.
Regards
Sub
Re: M1A1HA, 11-8 Update. Auto Track Tensioner Completed
Thank you sir, I try hard!Sub wrote:Hi.
Awesome mechanical engineering Sir, your attention to detail dedication and authenticity to the full scale subject is an inspiration.
Just excellent, there is nothing more to say.
Regards
Sub
"Details make perfection, and perfection is not a detail."
Leonardo Da Vinci
Barry
"Details make perfection, and perfection is not a detail."
Leonardo Da Vinci
Leonardo Da Vinci
Re: M1A1HA, 11-8 Update. Auto Track Tensioner Completed
Hi Folks!
I have spent the last several weeks working out the bugs in the Tamiya Chassis, mainly the functional Self Adjusting Idler Mounts. I power it up using the original ElMod board as I knew it had worked and any problem would be with the Chassis.
With the tracks installed and "properly" tightened, during test run both tracks would throw after any turn other than on smooth surface. After studying the problem I determined that the Idlers were exhibiting too much "toe out" and the tracks were "walking" off the front of the idler wheel.
The problem was that the combination of bearing allowed too much lateral "play". After several different approaches to resolving the problem I finally hit on a solution that all but eliminated the play. The tracks now stay on during turns on any surface tried, roughed concrete, grass and asphalt.
On to getting the TK60G2 installed and functional so I can move on to final detail and paint.
Cheers for now,
Barry
"Details make perfection, and perfection is not a detail."
Leonardo Da Vinci
Leonardo Da Vinci
Re: M1A1HA, 11-30 Update. Chassis Operational Check.
Just a note, I'm still at it.
Getting all the electronics except GBs and Speaker "crammed" into the turret and neatly is proving challenging but I'm about there.
I did receive the Slip Ring (RC Tank Legion) with the 2x10amp circuits and it's going to work out fine, Thanks Tom! Fortunately the Abrams turret is large so there is enough room to fit the 3s Lipo Waiting on some connectors to terminate the remaining connections to the TK. Maybe some pictures by the weekend if connectors arrive.
TTFN,
Barry
"Details make perfection, and perfection is not a detail."
Leonardo Da Vinci
Leonardo Da Vinci
Re: M1A1HA, 1-12 Update, Turret electronics installation.
Well...Damn!
LED voltage is no longer relevant, I have blown out a resistor and the board now needs repair! In the vernacular of electronics, "I let the smoke out"!
Not sure why but it is something I did because the board had functioned at least the primary functions. So it will be going back to Clark for repair.
I will be pressing on by reinstalling the ElMod Fusion Pro.
Oh well,
Barry
"Details make perfection, and perfection is not a detail."
Leonardo Da Vinci
Leonardo Da Vinci
Re: M1A1HA, 1-12 Update, Turret electronics installation.
Barry,BarryC wrote:Well...Damn!
LED voltage is no longer relevant, I have blown out a resistor and the board now needs repair! In the vernacular of electronics, "I let the smoke out"!
Not sure why but it is something I did because the board had functioned at least the primary functions. So it will be going back to Clark for repair.
I will be pressing on by reinstalling the ElMod Fusion Pro.
Oh well,
Barry
That sucks to hear about the board.
I'd be interested in known what section you "put to torch'. Aka where were you connecting and what did you blacken? Any images? Possible grounding issue (aka metal jump due to inadvertent metal contact)?
Re: M1A1HA, 1-19 Update, Damaged the TK60G2 blown resistor!
Yep, a real bummer.
Powered up without issue (just turret) all seemed well. I turned on the GBS and tipped the turret forward and GBS raised the gun back to level. Next I smelled that unmistakable odor of burnt electronics. After 45 years in electronic it is the oh sh!t moment and immediate shut down.
I saw nothing on the top side of the board but smell was real. After removing the board I found a blown resistor. Board is not marked as to which resistor it was and it destroyed the resistor so no value marking remained.
Barry
"Details make perfection, and perfection is not a detail."
Leonardo Da Vinci
Leonardo Da Vinci
Re: M1A1HA, 1-19 Update, Damaged the TK60G2 blown resistor!
What a bad luck, Barry
It looks like a serious short circuit near one of the largest capacitors and LED 5 socket. Unfortunately, Clark does not provide a schematic or a detailed photo of the front of your PCB, just something like this:
http://www.clark-model.com/eng/prod_rx6 ... 20v1_0.jpg
so I can only guess. You can also check if any of these large capacitors did not get strangely thick (the notches at the top must be flat). From the size of this resistor and the surrounding elements (large capacitors on the other side), I can guess that the power filter element for the entire PCB has burned out ... I hope that only this has failed and that it can be repaired quite easily.
Maybe someone from the owners of the TK 60 can take a photo of this board with a working resistor so that its value can be read?
P.s. Have you contacted Clark about a repair?
Re: M1A1HA, 1-19 Update, Damaged the TK60G2 blown resistor!
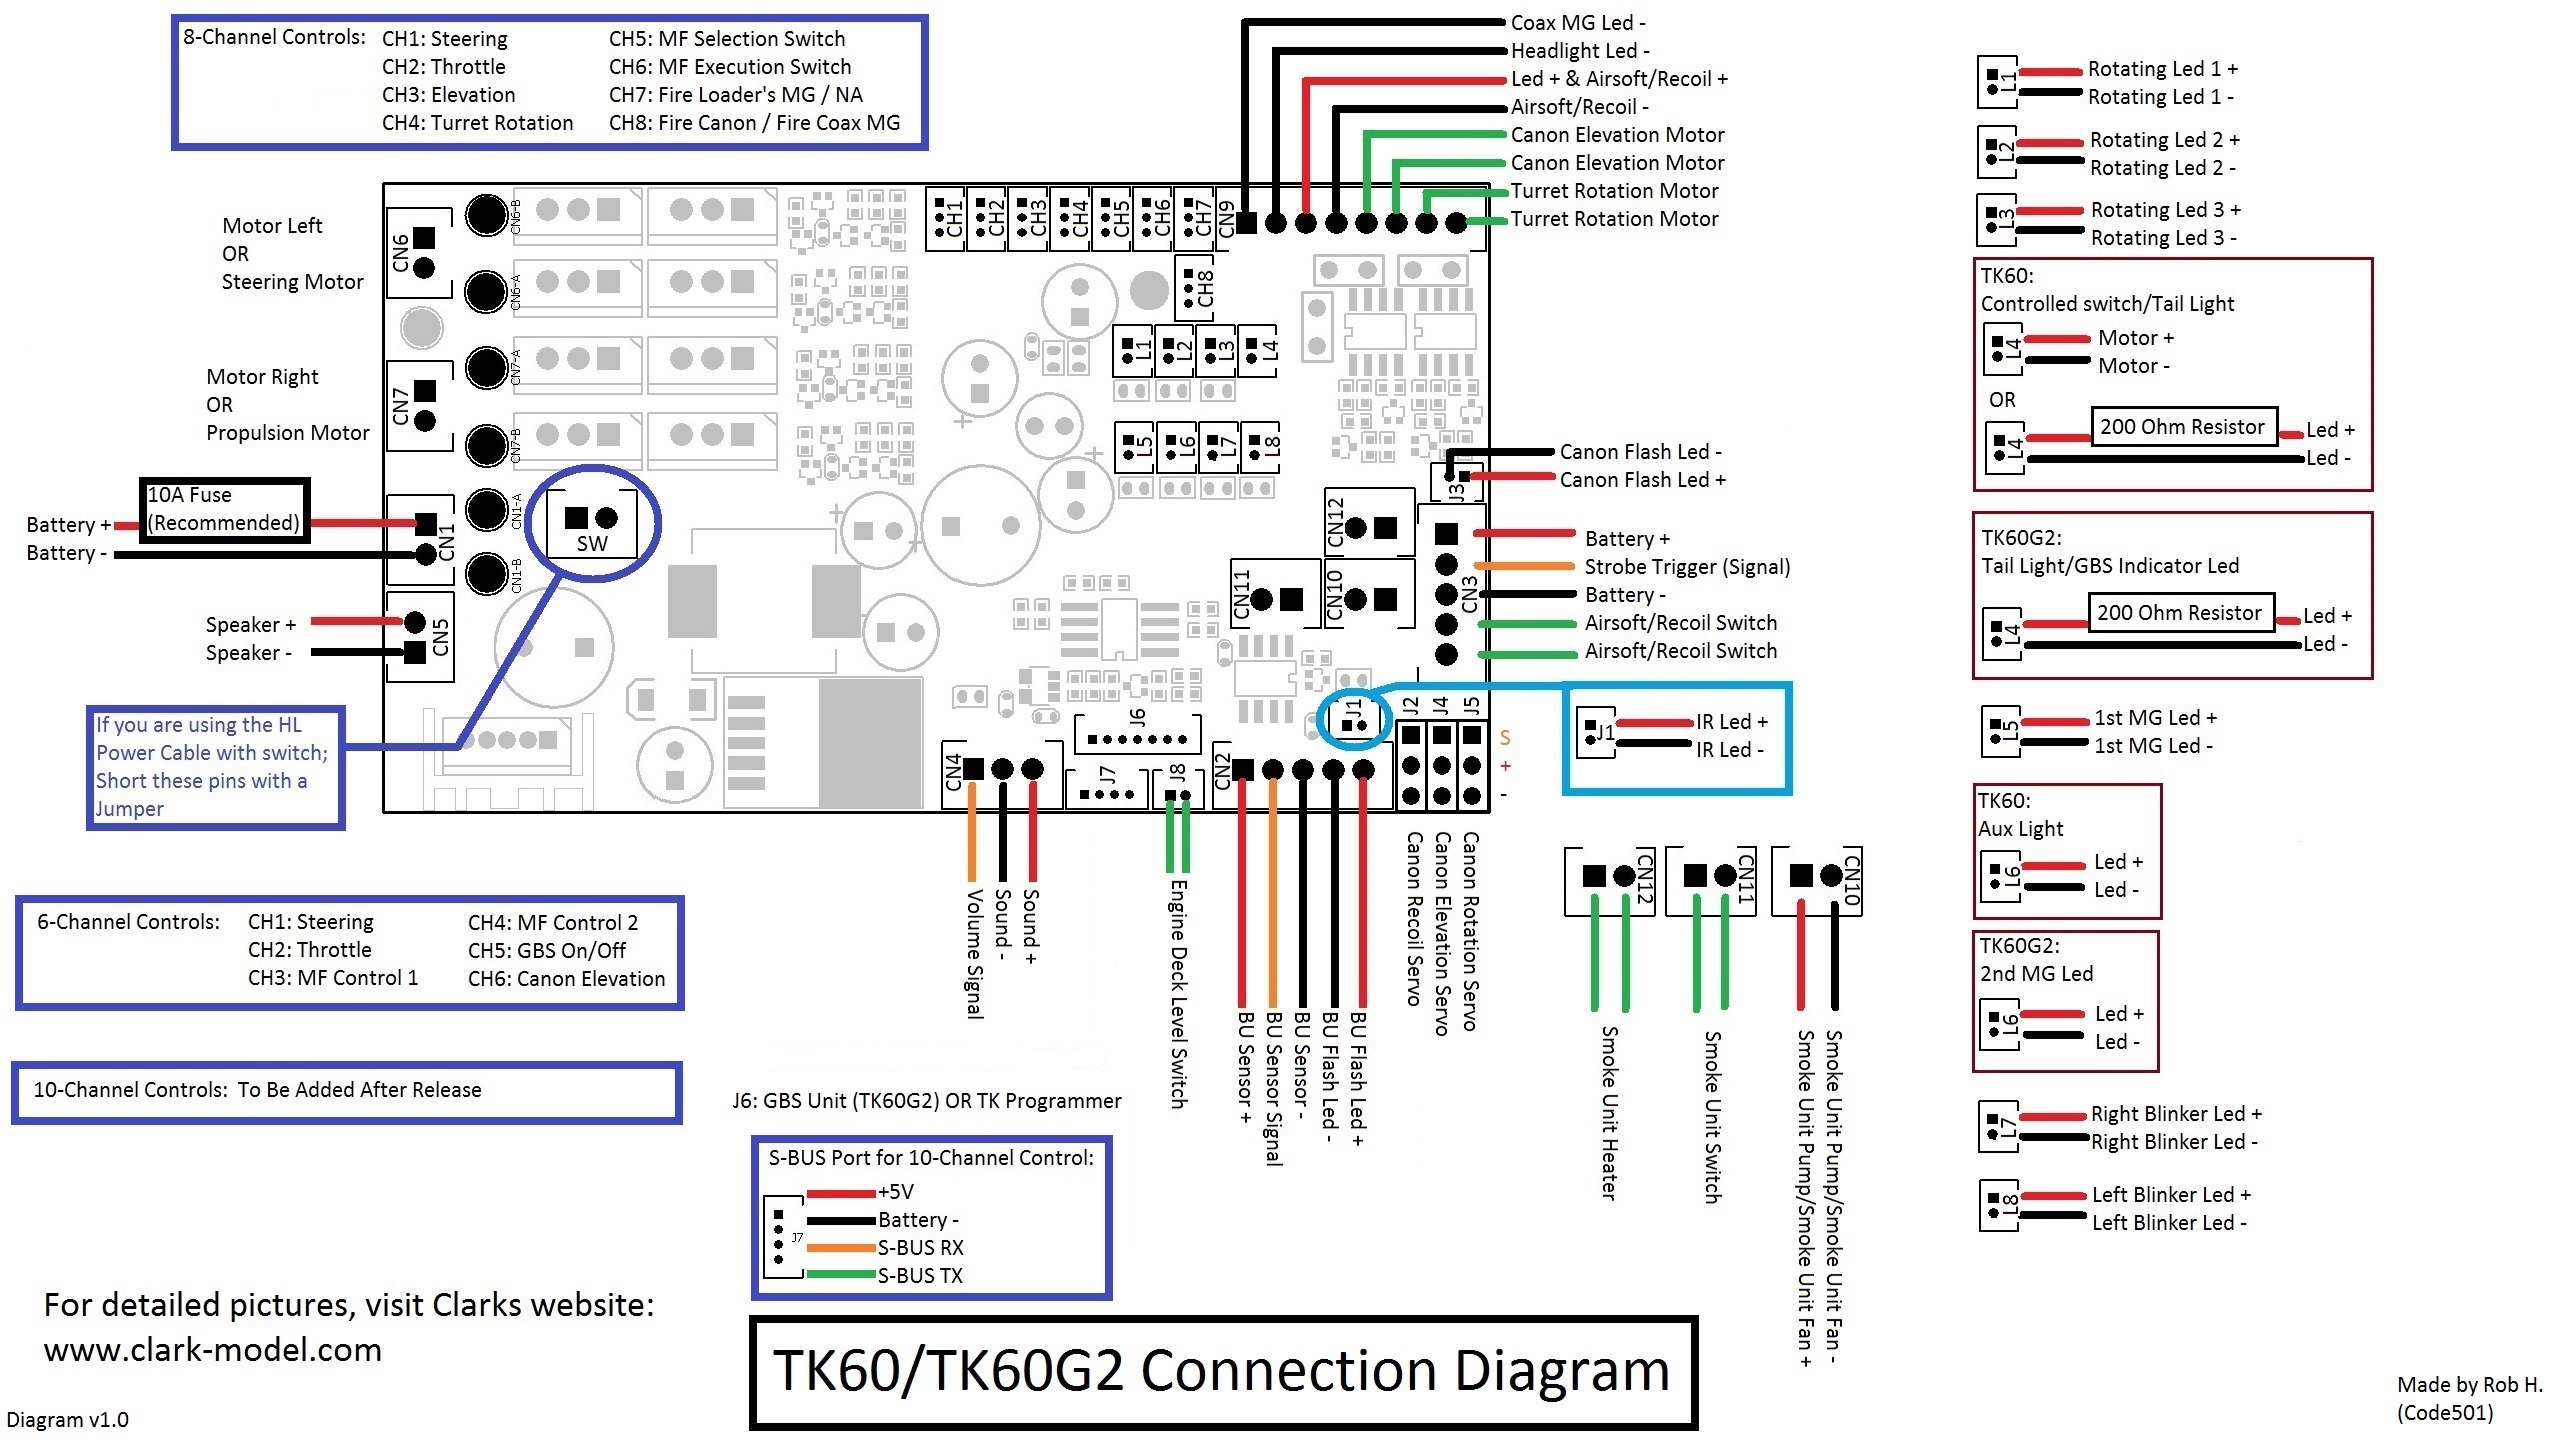
Clark will do a repair fairly cheaply. When I had a failed rotation it's usually the 2.2ohm resistor next to the rotation port on the 8 pin. I did have an issue with my servo functions which Clark said to solder over a resistor, sadly not your one! But it does show what yours was beforeBarryC wrote:Yep, a real bummer.
Powered up without issue (just turret) all seemed well. I turned on the GBS and tipped the turret forward and GBS raised the gun back to level. Next I smelled that unmistakable odor of burnt electronics. After 45 years in electronic it is the oh sh!t moment and immediate shut down.
I saw nothing on the top side of the board but smell was real. After removing the board I found a blown resistor. Board is not marked as to which resistor it was and it destroyed the resistor so no value marking remained.
Barry
Sent from my SM-G973F using Tapatalk
Re: M1A1HA, 1-19 Update, Damaged the TK60G2 blown resistor!
Thanks Tom.
Barry
Barry
"Details make perfection, and perfection is not a detail."
Leonardo Da Vinci
Leonardo Da Vinci