As you know, removing the tracks is super easy. But the bogies are driving me nuts!
M4A3 105 HengLong Headache
Forum rules
If your question is electronics related please post it in one of the relevant boards here: viewforum.php?f=31
If your question is electronics related please post it in one of the relevant boards here: viewforum.php?f=31
-
Herr Dr. Professor

- Lieutenant
- Posts: 3591
- Joined: Mon Apr 22, 2019 10:48 pm
- Location: Southern Wisconsin USA
M4A3 105 HengLong Headache
I have two of the HengLong M4A3 105s, 6.0s boards, both upgraded to all steel gears/metal tracks, idlers, bogies, sprockets--all unpainted. I want to paint and probably do winter camouflage on one of these Shermans.
As you know, removing the tracks is super easy. But the bogies are driving me nuts! There are covers over what I presume are screws, blind on the inside. Those metal covers don't want to budge.
  Does any of you have suggestions as to how to remove the bogies without making a nasty mess? Otherwise, I will have to resort to pretty fancy masking to cover the tires.
As you know, removing the tracks is super easy. But the bogies are driving me nuts!
-
Kaczor

- Warrant Officer 1st Class
- Posts: 1771
- Joined: Fri May 18, 2018 9:58 am
- Location: Ciechanow, Poland
- Contact:
Re: M4A3 105 HengLong Headache
Yep, in comparison to Taigen or Mato, HL Sherman bogies monting is awful. Try tu use very thin flathead screwdriver to prize the cover.
Also: you can only remove road wheels for painting.
Also: you can only remove road wheels for painting.

Re: M4A3 105 HengLong Headache
Have an image of your bogies?
Similar top these?
Similar top these?
Re: M4A3 105 HengLong Headache
Thats the mato suspension Jarlath
if it heng long metal front
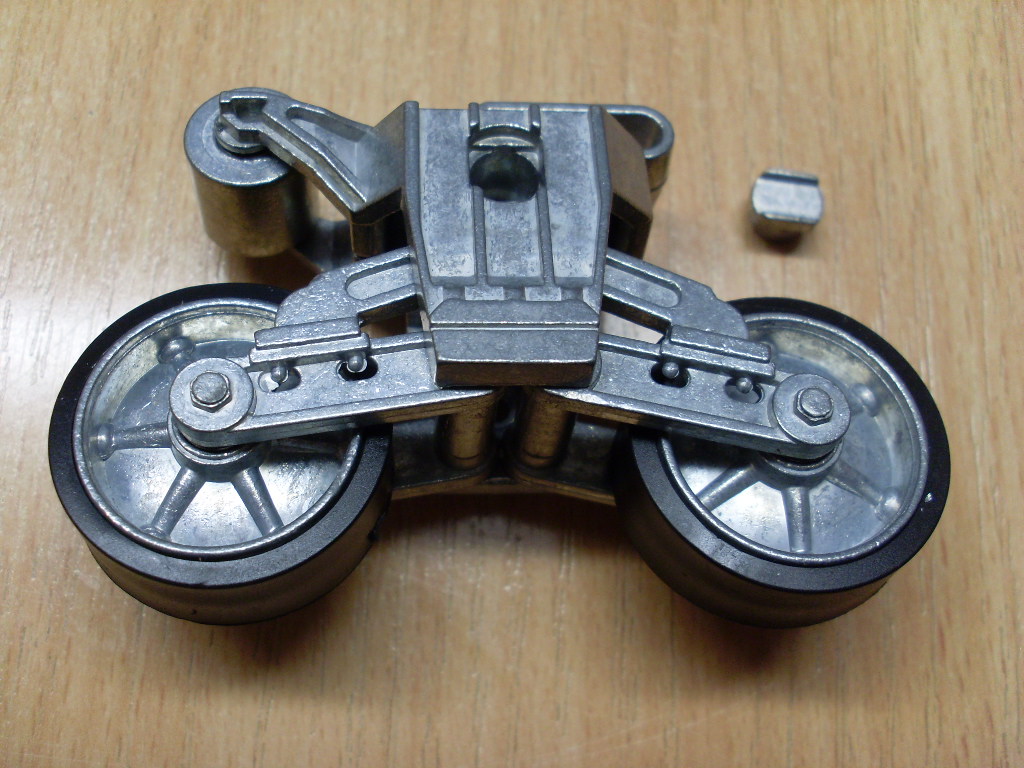
back wheels look like they unscrew

if it heng long metal front
back wheels look like they unscrew
-
Son of a gun-ner

- Lieutenant-Colonel
- Posts: 6923
- Joined: Sun May 07, 2017 8:49 pm
- Location: Surrey UK
Re: M4A3 105 HengLong Headache
That little screw at the back of the swing arms is only a self tapper that holds the two halves of the swing arm together, you wouldn't be able to remove the wheels without removing the whole unit.
I'm afraid the only way to remove this type of bogie, is to remove that little cover first.
I'm disappointed they came with that fitted, the plastic ones are left off till the new owner fits them along with the other detail parts. Hopefully they're not glued in.
I'm afraid the only way to remove this type of bogie, is to remove that little cover first.
I'm disappointed they came with that fitted, the plastic ones are left off till the new owner fits them along with the other detail parts. Hopefully they're not glued in.
- Attachments
-
Mick - The grit in the underpants of life!
And always happy to spare the bytes
TOTM needs YOU support YOUR TOTM competition, I'm doing my part, are YOU?
And always happy to spare the bytes
TOTM needs YOU
-
Model Builder 4

- 2nd Lieutenant
- Posts: 2329
- Joined: Sun Jul 26, 2015 3:46 pm
- Location: South Wales valleys
- Contact:
Re: M4A3 105 HengLong Headache
Hello professor,
I guess it's something that you most probably don't want to do but one option to remove the caps would be to drill a smallish hole in the centre then insert a self tapping screw and finally use a pliers to try and pull the cap out by the screw, this way you will avoid trying to dig it out around the edges and possibly damaging the surrounding metal on the bogie which will make it look awful. Try doing this with one first just in case as others have said they could be glued in If they do then come out and you've been careful enough not to cause too much damage you then have another couple of options, you can either remove the screws and use some milliput or similar putty to refill the holes or buy a set of plastic cap covers which I have seen available to buy separately from forgebear for a couple of pounds. If you go with the plastic caps they may also be far easier to remove for future maintenance if you ever need to do so, i hope my ramblings may be of some help to you or at least give you some ideas
Cheers, Lee.
I guess it's something that you most probably don't want to do but one option to remove the caps would be to drill a smallish hole in the centre then insert a self tapping screw and finally use a pliers to try and pull the cap out by the screw, this way you will avoid trying to dig it out around the edges and possibly damaging the surrounding metal on the bogie which will make it look awful. Try doing this with one first just in case as others have said they could be glued in
Cheers, Lee.
Me ? Addicted ? Never !!
-
Herr Dr. Professor
- Lieutenant
- Posts: 3591
- Joined: Mon Apr 22, 2019 10:48 pm
- Location: Southern Wisconsin USA
Re: M4A3 105 HengLong Headache
John, Lee, SOG: thanks for your suggestions. My internet goes in and out, especially during the summer, but I am back, at least for a few minutes.
It looks as if it's as bad as I feared. WHY would they put the suspension on the upgrade without paint!

I did try prying (prising) the caps out with a small, fine-bladed screwdriver. The caps are so snug, there's no way to wedge the blade in for leverage. I thought about the pliers, but figured one of you might know of a better solution. I also looked at the drill press and ...
So next I will try a touch of penetrating oil and then see if a small-nosed vise-grips can convince the caps to come out. After that fails (ever the optimist I am), I will decide between the drill press (and plastic caps) or fancy masking.
Naturally, I want to prime, paint OD, and then paint white for winter camouflage. My gratitude to you all. Stay tuned for more cussing!
It looks as if it's as bad as I feared.
I did try prying (prising) the caps out with a small, fine-bladed screwdriver. The caps are so snug, there's no way to wedge the blade in for leverage. I thought about the pliers, but figured one of you might know of a better solution. I also looked at the drill press and ...
So next I will try a touch of penetrating oil and then see if a small-nosed vise-grips can convince the caps to come out. After that fails (ever the optimist I am), I will decide between the drill press (and plastic caps) or fancy masking.
Naturally, I want to prime, paint OD, and then paint white for winter camouflage. My gratitude to you all. Stay tuned for more cussing!
-
Son of a gun-ner
- Lieutenant-Colonel
- Posts: 6923
- Joined: Sun May 07, 2017 8:49 pm
- Location: Surrey UK
Re: M4A3 105 HengLong Headache
I have started to modify my Heng Long plastic bogies with a 32mm long M4 hexagonal head screw.
The front screw holes in the bogies are roughly 7mm, the across flats measurement of a standard 4mm bolt/screw is 7mm.
I use a small file to form a sort of hook shape on all six corners under the head of the bolt, like cutting teeth.
Then I enlarge the screw holes in the bogies and through the chassis with a 4mm drill bit.
The chassis has six little pegs about 15mm long sticking out for the bogies to locate on, the only problem, they are only 6mm diameter for about half their length, and about 4.5mm diameter for the remaining portion, this latter half needs to be cut off and the hole in the 6mm diameter part carefully drilled out to 4mm.
I then put the screw though the bogies from the front, put a 4mm penny washer and nut on the thread and tighten the nut drawing the screw head into the front of the bogie till the nut won't tighten anymore without causing damage. The screws are now trapped in the front half of the bogies.
Then the nut and washer are removed, the bogie is fitted to the chassis and I then use a nylock nut with that penny washer to hold the bogies in place. If you tighten the nut too much, it can over tighten the bogies and stop the suspension operating properly, therefore using a nylock nut allows some adjustment.
A very thin shim type washer could be used between the bogie halves, but they're not so readily available, and it's unnecessary faffing about.
Then just glue in the screw caps, fill and forget they're there.
You can cut off any excess screw length after fitting.
There is only one problem with doing this, the two front bogies are where the gearboxes are. So you would have to drill a couple of holes in them to clear the nuts.
I haven't tried this with the metal bogies yet, but I can't see why it won't work.
Mick - The grit in the underpants of life!
And always happy to spare the bytes
TOTM needs YOU support YOUR TOTM competition, I'm doing my part, are YOU?
And always happy to spare the bytes
TOTM needs YOU
-
Herr Dr. Professor
- Lieutenant
- Posts: 3591
- Joined: Mon Apr 22, 2019 10:48 pm
- Location: Southern Wisconsin USA
Re: M4A3 105 HengLong Headache
Thank you! If I do decide to attack the caps with the drill press, your experience at re-attaching will be a help. So far the covers won’t budge a micro-meter. Today I am going to try masking. If that’s satisfactory, I will be able to prime and paint OD 34087. I have done lots of masking over the years, so I’m more optimistic about that approach.
I will likely then do a whitewash camouflage as was done by Patton’s 6th Armored. On the lower hull, only the outer faces of the bogies were white.
I will likely then do a whitewash camouflage as was done by Patton’s 6th Armored. On the lower hull, only the outer faces of the bogies were white.
-
Son of a gun-ner
- Lieutenant-Colonel
- Posts: 6923
- Joined: Sun May 07, 2017 8:49 pm
- Location: Surrey UK
Re: M4A3 105 HengLong Headache
Well, if you do try my method, using a 4mm drill bit instead of the standard 4.2mm clearance size drill bit gives a tighter fit while removing the minimal amount of plastic from those locating pegs on the chassis.
Also it may help to use a 3mm drill bit first before using the 4mm drill bit when drilling the six pegs on the chassis.
Also it may help to use a 3mm drill bit first before using the 4mm drill bit when drilling the six pegs on the chassis.
Mick - The grit in the underpants of life!
And always happy to spare the bytes
TOTM needs YOU support YOUR TOTM competition, I'm doing my part, are YOU?
And always happy to spare the bytes
TOTM needs YOU
