Airbrushing Techniques
-
silversurfer1947
- Lieutenant
- Posts: 3338
- Joined: Tue Oct 27, 2015 9:54 pm
- Location: Bristol, UK
Airbrushing Techniques
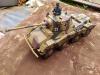
I am still a novice when it comes to airbrushing. I am using a Iwata Neo powered by a compressor with a tank and moisture trap. What I want to achieve is a clean but soft edge to my camouflage. I seem to be getting a lot of overspray and would like some idea of what pressure I should use. Also, the needle is set as far forward as it will go - is this right and what would be the effect of moving it back a little, please? How close should I be spraying from?
Richard
Tamiya Tiger 1, Taigen FlakPanzer IV,Torro M16 half-track, Tamiya Panther,WSN/Torro T34,Taigen M41 Bulldog,H/l/Taigen Sherman M4A3,H/L T90, Haya M3 Grant, Metal Origins 234/2 Puma, Nashorn by Alwyn. I was only going to have one tank - honest!
Tamiya Tiger 1, Taigen FlakPanzer IV,Torro M16 half-track, Tamiya Panther,WSN/Torro T34,Taigen M41 Bulldog,H/l/Taigen Sherman M4A3,H/L T90, Haya M3 Grant, Metal Origins 234/2 Puma, Nashorn by Alwyn. I was only going to have one tank - honest!
-
HERMAN BIX

- Brigadier
- Posts: 10300
- Joined: Sun Jan 12, 2014 12:15 am
- Location: Gold Coast,Australia
Re: Airbrushing Techniques
First off, I have no experience with the IWATA unit.
But, the consistent thing I get from needing to vary volume, width, and edging profile are
- paint viscosity
- trigger delivery setting (mine is adjustable for trigger setting allowing less or more paint when the trigger is on the stop)
- pressure setting. no more than 7 psi for fine work.
- distance from subject. This is a variable equation of all the above.
I always thin my Tamiya paint 50/50 with thinners.
I always set my trigger delivery at minimum, unless there is a requirement to cover a wider area(like a base coat)
Pressure at 7psi up to 15 depending on viscosity and coverage requirement.
I always have a sheet of copy paper handy to test-burst the setting onto before going to the subject .
There is no definitive setting as there are too many variables................
Best to start with minimum delivery capability, then adjust up............
Practice will make it.
HL JAGDPANTHER,HL TIGER 1,HL PzIII MUNITIONSCHLEPPER, HL KT OCTOPUS,HL PANTHER ZU-FUSS,HL STuG III,HL T34/85 BEDSPRING,
HL PZIV MALTA,MATORRO JAGDTIGER,HL F05 TIGER,TAMIYA KT,HL PANTHERDOZER,HL EARLY PANTHER G,TAIGEN/RAMINATOR T34/76,
HL AN-BRI-RAM SU-85
HL PZIV MALTA,MATORRO JAGDTIGER,HL F05 TIGER,TAMIYA KT,HL PANTHERDOZER,HL EARLY PANTHER G,TAIGEN/RAMINATOR T34/76,
HL AN-BRI-RAM SU-85
-
silversurfer1947
- Lieutenant
- Posts: 3338
- Joined: Tue Oct 27, 2015 9:54 pm
- Location: Bristol, UK
Re: Airbrushing Techniques
Thanks Mr H. I have been using too high a pressure, I think. Add to that what I guess is a heavy finger on the trigger. I have been trying too hard to get it done in one go. (Patience is not one of my foremost virtues!) The pressure setting is now greatly reduced, so we shall see what happens. I must remember Rome was not built in a day.
Richard
Tamiya Tiger 1, Taigen FlakPanzer IV,Torro M16 half-track, Tamiya Panther,WSN/Torro T34,Taigen M41 Bulldog,H/l/Taigen Sherman M4A3,H/L T90, Haya M3 Grant, Metal Origins 234/2 Puma, Nashorn by Alwyn. I was only going to have one tank - honest!
Tamiya Tiger 1, Taigen FlakPanzer IV,Torro M16 half-track, Tamiya Panther,WSN/Torro T34,Taigen M41 Bulldog,H/l/Taigen Sherman M4A3,H/L T90, Haya M3 Grant, Metal Origins 234/2 Puma, Nashorn by Alwyn. I was only going to have one tank - honest!
-
HERMAN BIX
- Brigadier
- Posts: 10300
- Joined: Sun Jan 12, 2014 12:15 am
- Location: Gold Coast,Australia
Re: Airbrushing Techniques
I have been schooled by some very good students of the airbrush, and the thing they all agree is, practice, and patience.
I did a Jagdpanther as a first go at airbrush use. It needed a broad fan coverage, and as such, paint that was slightly thick to avoid runs.
Hindsight is, too much paint, too slow to apply it, = a blobby look.
If you go to thin- it runs or wont cover.
If you go to thick- the paint wont spray- so you up the pressure, and then its hard to control.
Thin paint can be thickened, test on the paper
Thick paint can be thinned, test on paper
Low pressure and 60-40 paint/thinners on a low pressure- close in can give you fine lines.
Like I said..............practice.
and test paper !
HL JAGDPANTHER,HL TIGER 1,HL PzIII MUNITIONSCHLEPPER, HL KT OCTOPUS,HL PANTHER ZU-FUSS,HL STuG III,HL T34/85 BEDSPRING,
HL PZIV MALTA,MATORRO JAGDTIGER,HL F05 TIGER,TAMIYA KT,HL PANTHERDOZER,HL EARLY PANTHER G,TAIGEN/RAMINATOR T34/76,
HL AN-BRI-RAM SU-85
HL PZIV MALTA,MATORRO JAGDTIGER,HL F05 TIGER,TAMIYA KT,HL PANTHERDOZER,HL EARLY PANTHER G,TAIGEN/RAMINATOR T34/76,
HL AN-BRI-RAM SU-85
-
HERMAN BIX
- Brigadier
- Posts: 10300
- Joined: Sun Jan 12, 2014 12:15 am
- Location: Gold Coast,Australia
Re: Airbrushing Techniques
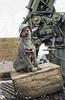
Oh, and with that Puma of yours, the angle changes can really be an issue(the guards where they meet the hull for example)
if you are doing a patch style cam, the angle joints are not so bad, but if you are doing thin lines, the combined angles at the guard joints attract overspray like mad between colours !
Pressure, and viscosity.........oh, and practice !!
if you are doing a patch style cam, the angle joints are not so bad, but if you are doing thin lines, the combined angles at the guard joints attract overspray like mad between colours !
Pressure, and viscosity.........oh, and practice !!
HL JAGDPANTHER,HL TIGER 1,HL PzIII MUNITIONSCHLEPPER, HL KT OCTOPUS,HL PANTHER ZU-FUSS,HL STuG III,HL T34/85 BEDSPRING,
HL PZIV MALTA,MATORRO JAGDTIGER,HL F05 TIGER,TAMIYA KT,HL PANTHERDOZER,HL EARLY PANTHER G,TAIGEN/RAMINATOR T34/76,
HL AN-BRI-RAM SU-85
HL PZIV MALTA,MATORRO JAGDTIGER,HL F05 TIGER,TAMIYA KT,HL PANTHERDOZER,HL EARLY PANTHER G,TAIGEN/RAMINATOR T34/76,
HL AN-BRI-RAM SU-85
-
Jake79
- Warrant Officer 2nd Class
- Posts: 1058
- Joined: Mon Aug 11, 2014 9:10 pm
- Location: Essex,Colchester, UK
Re: Airbrushing Techniques
Lower pressure up close 8-12psi
For broader coverage 15psi..does the trick for me, currently I'm using the Iwata TRN2 trigger brush, 0.5 needle.
For broader coverage 15psi..does the trick for me, currently I'm using the Iwata TRN2 trigger brush, 0.5 needle.
Tamiya: 2 King Tigers
H/L,Taigen :Initial Tiger 1, Panzer III, Kv 2, Panther G, Bulldog, Leo 2A6
H/L,Taigen :Initial Tiger 1, Panzer III, Kv 2, Panther G, Bulldog, Leo 2A6
-
Spam In A Can 26
- Lance Corporal
- Posts: 107
- Joined: Thu Dec 29, 2016 7:10 pm
- Location: MD, U.S.A.
Re: Airbrushing Techniques
AS a beginner I made (I guess) a classic mistake, I assumed the airbrush worked alone, it doesn't!
I now use the paintbrush, airbrush, masks & tapes all together & that's a huge difference. Masks I cut from thin card & spray through holes or along edges depending on what I'm doing. I use the blue "light stick" masking tape actually stuck on & cut for sharp edges as well.
I have almost the identical setup to you. I found that needle & jet size were vital to getting the correct flow. If you're using thick paints get the larger 0.5mm nozzle & needle rather than the supplied 3.5.
I use the paint slightly diluted also as it flows better a little thinner. Its a suck it & see thing so start with very little & dilute till it "runs good"!
The needle MUST be fully forwards otherwise you'll get internal seepage & that's a bear to clean, even with water-based paints.
I use the brush together with a mask (card with a hole in it) to keep the edge fuzzy but not mushy. For water-based acrylics I go between 12 ~16Lbs of air, too low & you'll get "spluttering" where the pains exits in blobs rather than as a aerosol, which is what you need.
I got a single bottle of (cheap) black paint & a couple of large (free) mailing boxes from the Post Office & learned the basics with just that. It takes a while to get the "feel" for an airbrush & there are enough variables that its hard to give specific numbers. Distance, pressure, dilution & so on all factor in so you have to kinda sneak up on it yourself.
To me Distance & pressure are opposite sides of the same coin. If you want a fine line you will be very close, but you'll also run very little pull back for paint, full air pressure (up & down) though. I always depress fully then slowly pull back to get the exact amount of paint, but at a steady pressure. As I come back for more of an area coverage I increase flow as well.
