WINTER 23-24 KV-1 to KV-85 to KV-2 COMPLETED!

This section is for builds done in groups and collaboration on projects!
Post Reply
ColemanCollector
Sergeant
Posts: 675
Joined: Sat Jan 14, 2023 8:50 pm
Location: Ontario, Canada

Re: WINTER 23-24 KV-1 to KV-85 to KV-2 Phew!

Post by ColemanCollector »

Artem RedArmy wrote: Wed Feb 07, 2024 6:45 pm Image
KV-2 was cleaned of rust, primed and painted
So nice to see it being cared for against the elements of outdoor display. Looks like Bovington, Saumur, Koblenz, and Moscow are on the tankwatching itinerary!
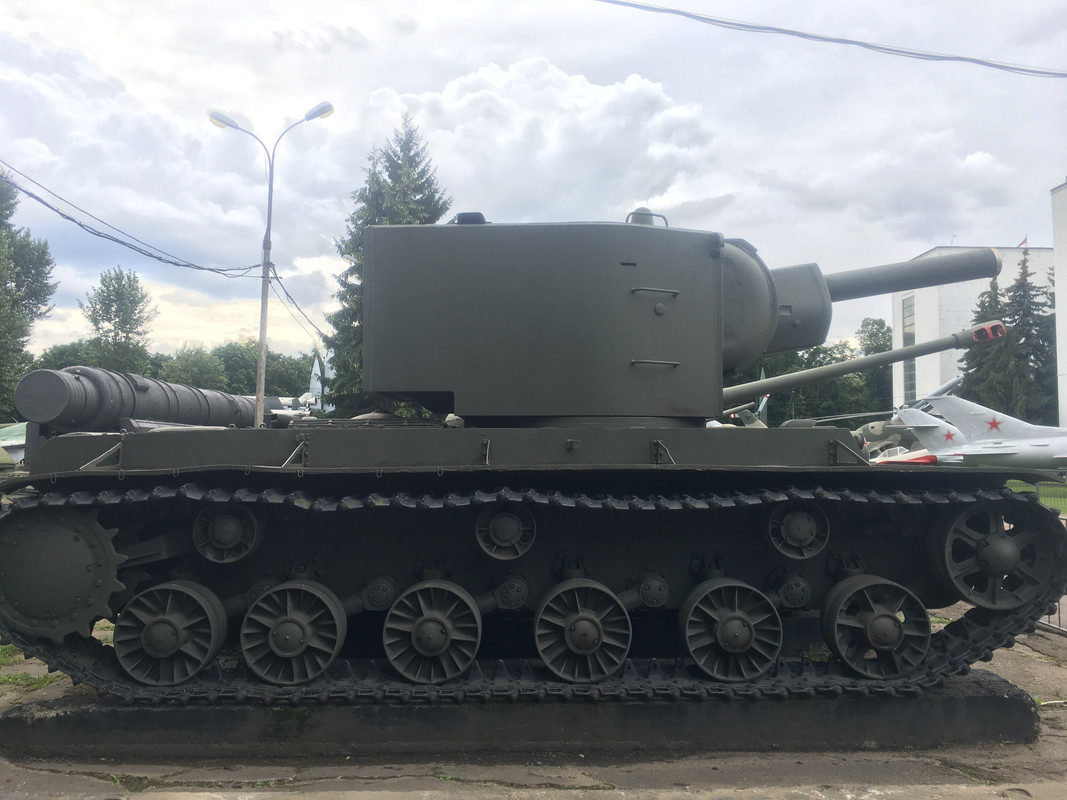
Mike.
ColemanCollector
Sergeant
Posts: 675
Joined: Sat Jan 14, 2023 8:50 pm
Location: Ontario, Canada

Re: WINTER 23-24 KV-1 to KV-85 to KV-2 Phew!

Post by ColemanCollector »

All right! Time to get this KV-2 looking like it should when it comes to engine deck fashionability, after my welding faux pas!

Here's the real deal and you'll notice the engine deck covers come up tight to the hull sides and are bolted down to allow removal.
IMG-7823.jpg
IMG-7823.jpg (129.94 KiB) Viewed 312 times
KV-2-16.jpg
KV-2-16.jpg (119.64 KiB) Viewed 312 times
HL interprets it like this--a shallow trench with weldy marks running the length of the hull. The engine deck covers are the same width as the rest of the tank and appear welded down.
20240207_165416.jpg
20240207_165416.jpg (2.13 MiB) Viewed 312 times
Silly goose me decided to bring the welds up to the proper height which is correct for everywhere, but not where the engine deck covers run. Eagle-eye Artem Redarmy caught that gaffe (marked in blue below), so let's get to work and get the KVaucity back into this Dreadnought!
20240112_161936.jpg
20240112_161936.jpg (828.21 KiB) Viewed 312 times
A little filing and sanding gets the welds down to height. Every little black mark is a low spot that needs filling.
20240207_141347.jpg
20240207_141347.jpg (1.73 MiB) Viewed 312 times
A skim of filler followed by sanding eliminates the evil weld and fills in HLs gap completely.
A little scribing with my schwanky new scribing tool (go figure!), and voila! We now have engine deck covers nice and tight to the hull sides, but no welds--neither mine nor Heng Longs! Life is good.
20240207_141932.jpg
20240207_141932.jpg (1.58 MiB) Viewed 312 times
20240207_163517.jpg
20240207_163517.jpg (1.63 MiB) Viewed 312 times
20240207_163538.jpg
20240207_163538.jpg (1.64 MiB) Viewed 312 times
A little surface texture, some flame cuts on the hull side tops and all is well in KV-2 land.
20240207_164810.jpg
20240207_164810.jpg (1.83 MiB) Viewed 312 times
20240207_164823.jpg
20240207_164823.jpg (1.59 MiB) Viewed 312 times
20240207_165348.jpg
20240207_165348.jpg (2.01 MiB) Viewed 312 times
Got to admit, this was actually a pretty fun little bit of corrective detailing. Rarely--ok never--do I get to ask somebody who has actually crawled over a KV-2 if things look OK, soooo Artem RedArmy do things look ok? LOL

Mike.
Attachments
20240207_163559.jpg
20240207_163559.jpg (2.15 MiB) Viewed 312 times
User avatar
Ecam
Warrant Officer 1st Class
Posts: 1562
Joined: Sun Jul 13, 2014 6:30 pm
Location: Lake of the Ozarks, USA

Re: WINTER 23-24 KV-1 to KV-85 to KV-2 Phew!

Post by Ecam »

Great job on the fix. Sometimes it hurts a little to find out after a job is complete. I tend to jump in without much research and have been "bit" a few times.
"Don't believe everything you see on the internet" - George S. Patton

Eric
ColemanCollector
Sergeant
Posts: 675
Joined: Sat Jan 14, 2023 8:50 pm
Location: Ontario, Canada

Re: WINTER 23-24 KV-1 to KV-85 to KV-2 Phew!

Post by ColemanCollector »

Thanks! Actually, it's the way I would've done the work from the get go to fix HL's inaccuracy, just took me awhile to get around to it! I suspect most HL KV's get left as is with the incorrect trench and fakey weld marks by the engine compartment covers.

Mike.
User avatar
Panzermechaniker
Lance Corporal
Posts: 183
Joined: Wed Feb 08, 2023 1:04 am
Location: Toronto

Re: WINTER 23-24 KV-1 to KV-85 to KV-2 Phew!

Post by Panzermechaniker »

Nice looking KV-2. Maybe you could get down to the K-W field this summer to give it a run. My Tamiya needs company as the minute it goes out on the field every other tank is shooting the big ugly duckling :D
User avatar
HERMAN BIX
Brigadier
Posts: 10411
Joined: Sun Jan 12, 2014 12:15 am
Location: Gold Coast,Australia

Re: WINTER 23-24 KV-1 to KV-85 to KV-2 Phew!

Post by HERMAN BIX »

Panzermechaniker wrote: Fri Feb 09, 2024 1:09 am Nice looking KV-2. Maybe you could get down to the K-W field this summer to give it a run. My Tamiya needs company as the minute it goes out on the field every other tank is shooting the big ugly duckling :D
And what a target it is !!
The sad part is an I.R. beam has no respect for armour thickness when imagining back in the day, a poor PzIII commander would have laid a cable ( :poop: :poop: :poop: :poop: ) when one of these wandered into the gunsights.
HL JAGDPANTHER,HL TIGER 1,HL PzIII MUNITIONSCHLEPPER, HL KT OCTOPUS,HL PANTHER ZU-FUSS,HL STuG III,HL T34/85 BEDSPRING,
HL PZIV MALTA,MATORRO JAGDTIGER,HL F05 TIGER,TAMIYA KT,HL PANTHERDOZER,HL EARLY PANTHER G,TAIGEN/RAMINATOR T34/76,
HL AN-BRI-RAM SU-85
ColemanCollector
Sergeant
Posts: 675
Joined: Sat Jan 14, 2023 8:50 pm
Location: Ontario, Canada

Re: WINTER 23-24 KV-1 to KV-85 to KV-2 Phew!

Post by ColemanCollector »

HERMAN BIX wrote: Fri Feb 09, 2024 8:01 am
Panzermechaniker wrote: Fri Feb 09, 2024 1:09 am Nice looking KV-2. Maybe you could get down to the K-W field this summer to give it a run. My Tamiya needs company as the minute it goes out on the field every other tank is shooting the big ugly duckling :D
And what a target it is !!
The sad part is an I.R. beam has no respect for armour thickness when imagining back in the day, a poor PzIII commander would have laid a cable ( :poop: :poop: :poop: :poop: ) when one of these wandered into the gunsights.
Looking at period photos of KV-2s, many fall into one of three categories:
1. Pristine condition perched at a precarious angle in a ditch and abandoned;
2. Shot and blown up to smithereens;
3. Being clammered over by curious German troops, some posing bravely for the camera whilst the others look in the turret hatch and are then figuring out the best place to do what Herman Bix mentions!

Mike.
User avatar
Panzermechaniker
Lance Corporal
Posts: 183
Joined: Wed Feb 08, 2023 1:04 am
Location: Toronto

Re: WINTER 23-24 KV-1 to KV-85 to KV-2 Phew!

Post by Panzermechaniker »

Yes they always look like some abandoned dog looking sad sitting mostly undamaged in a ditch in a lot of the photos. :D Definitely one of my favourite tanks to drive around the field
ColemanCollector
Sergeant
Posts: 675
Joined: Sat Jan 14, 2023 8:50 pm
Location: Ontario, Canada

Re: WINTER 23-24 KV-1 to KV-85 to KV-2 Phew!

Post by ColemanCollector »

I was dying to fiddle with something on my KV-2, but despite searching through over 300 images I just couldn't find a detailed shot of my goal--until Artem RedArmy posted his sprucing up shots of the only genuine KV-2 residing in Moscow. The turret sides and stern have cute little pistol ports that can be pushed out of the hull, and retrieved on their leash.
C28-A17-AA-0901-425-A-A291-D7-F5258-AF543.jpg
C28-A17-AA-0901-425-A-A291-D7-F5258-AF543.jpg (165.29 KiB) Viewed 240 times
9155-D4-C3-6-ECD-4479-97-A7-2-C1626-A233-CA.jpg
9155-D4-C3-6-ECD-4479-97-A7-2-C1626-A233-CA.jpg (171.49 KiB) Viewed 240 times
I decided to duplicate-ish, one of these ports on the backporch door of my turret. Drilled a pilot hole of 2mm, then reamed it out to 4.3mm so it had a taper.
20240209_111143.jpg
20240209_111143.jpg (670.83 KiB) Viewed 240 times
An old paintbrush handle cut at 4.3mm was then chucked in my precision lathe! I marked out the lines for shaping, adjusted the speed clamp for a precise 738rpm (sure), and got lathing!
20240209_111458.jpg
20240209_111458.jpg (677.71 KiB) Viewed 240 times
20240209_112804.jpg
20240209_112804.jpg (507.63 KiB) Viewed 240 times
20240209_112933.jpg
20240209_112933.jpg (401.28 KiB) Viewed 240 times
It's the basic shape--ish. A little sanding and paint, and thread to approximate its lanyard, and it actually fits the aperture nice and snug so I can display it open or closed up. A nail head for the outer cover gives it a bit of weight.
20240211_094906.jpg
20240211_094906.jpg (731.11 KiB) Viewed 240 times
20240210_135046.jpg
20240210_135046.jpg (971.31 KiB) Viewed 240 times
Inside is nothing fancy since I'll keep the hatch closed, otherwise the breech needs detailing, servos need hiding, wiring needs tucking, turret walls need painting, Mike needs scotching...
20240210_135353.jpg
20240210_135353.jpg (641.67 KiB) Viewed 240 times
I'm going to browse the interior photos more to determine the correct colour scheme for the pistol port plug's interior before weathering. The real hatch in this photo has some nasty flame cuts compared to the rest of the tank--must've been a Friday afternoon job at the Kirovskiy Plant!
C28-A17-AA-0901-425-A-A291-D7-F5258-AF543.jpg
C28-A17-AA-0901-425-A-A291-D7-F5258-AF543.jpg (165.29 KiB) Viewed 240 times
Next up--colour!

Mike.
ColemanCollector
Sergeant
Posts: 675
Joined: Sat Jan 14, 2023 8:50 pm
Location: Ontario, Canada

Re: WINTER 23-24 KV-1 to KV-85 to KV-2 Phew!

Post by ColemanCollector »

"It's Not Easy Being Green"--a photo essay...
20240208_132331.jpg
20240208_132331.jpg (883.31 KiB) Viewed 225 times
20240210_135114.jpg
20240210_135114.jpg (996.17 KiB) Viewed 225 times
20240210_135138.jpg
20240210_135138.jpg (775.04 KiB) Viewed 225 times
20240210_135222.jpg
20240210_135222.jpg (984.59 KiB) Viewed 225 times
20240211_095022.jpg
20240211_095022.jpg (731.69 KiB) Viewed 225 times
20240211_095125.jpg
20240211_095125.jpg (862.97 KiB) Viewed 225 times
Next up: weathering and whitewash...gulp...

Mike.
Post Reply

Return to “Group Builds”